
London’s system of underground trains, known simply as ‘the Underground’ or ‘the London tube,’ provides a convenient and cheap way to navigate the city, but it can be a little confusing for newbies.
As an Australian, the underground system was completely foreign to me when I visited London. I’m sharing with you what I learnt and the basics you need to know to get going on the tube like a pro!
This is just an overview of how to use the London Tube, for more detail, visit the official Transport for London website.
This blog post was created without the use of artificial intelligence (AI) and all featured images are original and captured by the author unless otherwise stated to maintain an authentic and honest representation.

Visiting London? Check out my perfect 4 day itinerary!
Map of the London Tube
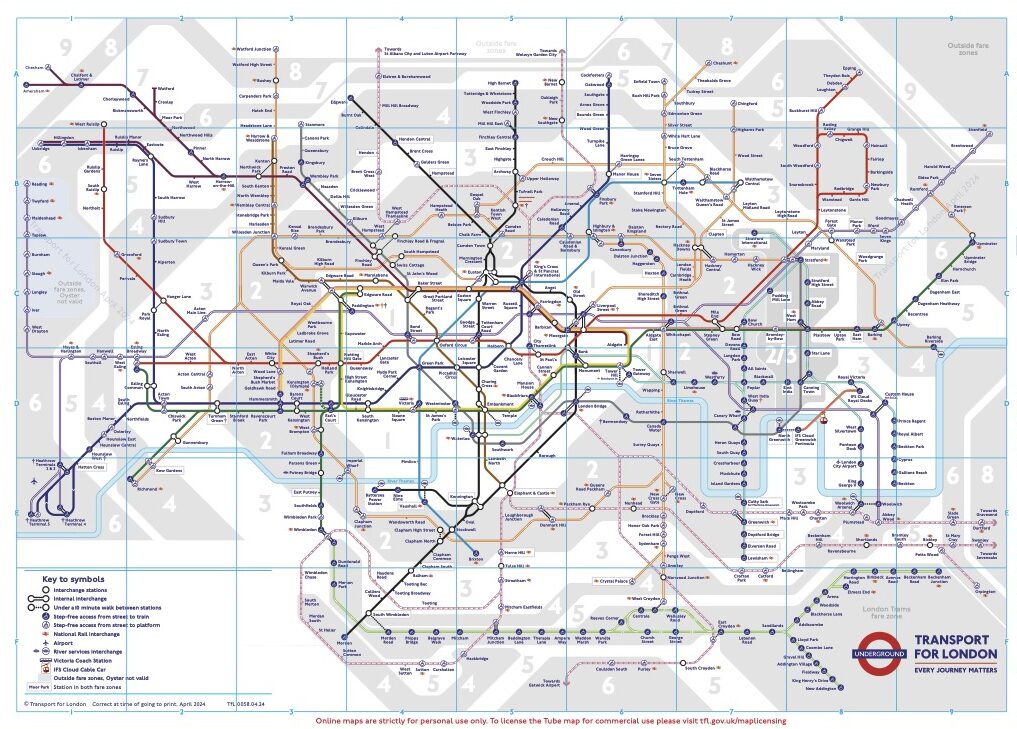
Access the underground map above via Transport for London.
I found it helpful to plan my journey using Google maps, or if it was a more complex journey, using the TFL website/app.
The main tube lines are:
Circle (yellow) – spiral shaped line that encircles the central area of London.
Central (red) – runs right through the centre of the city.
District (green) – runs from Kew Gardens through the southern area of the city.
Hammersmith and City (pink) – runs across the northern area of the city.
Piccadilly (dark blue) – runs from Heathrow Airport, through King’s Cross Station and north.
Elizabeth (purple) – London’s newest line runs through the centre of the city, similar to the Central line.
Zones and Prices of the London Tube
The London tube has 9 zones, spreading from the central city to the outskirts. How many zones you travel through determines the price of your journey.
As a tourist, you probably won’t leave Zone 1.
Travel in Zone 1: £2.90 peak / £2.80 off-peak
Travel in Zone 1 and 2: £3.50 peak / £2.90 off-peak
Children under 11 travel free. There are reduced travel fares for children between 11-15 (with an oyster card). There are no senior concessions.
London Travel Essentials
SIM cards: I swear by E-sims like Airalo and Gigago which you can install BEFORE travelling. This saves you the stress of running around to find one while jet-lagged or from being ripped off by local vendors. E-sims are perfect for backpackers who are travelling to multiple destinations in a short period of time.
Insurance: You should NEVER go overseas without getting travel insurance. We hope everything goes as planned, but there is always a chance you might get injured or your plans change. I personally always use Covermore, because the cover is super comprehensive and they were easy to work with when I needed to make a claim.
Banking: Free international transactions are a must when travelling. I use Up Bank, an online Australian bank, that allows fee-free overseas transactions, unlimited savings ‘pools’ and payments in any currency without needing to exchange. If you’re Aussie, join Up with my QR code we both get $14! Two similar and very popular options include Wise and Revolut.
How to pay for the London tube
- Debit Card
You can tap your regular bank card on the gates. The price is the same as it is for Oyster Cards.
Make sure that you are using a bank card that offers fee-free international transactions.
- Oyster Card
You can buy an Oyster Card for £7. This is fee is non-refundable. You can buy them online, at stations and visitor centres and top them up with money to use on public transport. I recommend this only for children over the age of 11 (so you can get the youth concession – children younger than 11 are free), or if your bank card that has international transaction fees.
- Travelcards
Transport for London also offers day or week travelcards that are either paper or loaded onto your Oyster card. This provides you with unlimited travel for a fixed price. However, the prices are quite high and only worth it if you intend on doing a lot of travelling.
Day travelcard: £16.60
Week travelcard: £44.70
Read: 10 FREE or CHEAP Things to do in London
How to use the London Tube
- Plan your journey either on the Transport for London website/app or using Google maps. Make a note of which underground line/s (Circle, District, Hammersmith etc), station/s and platform/s you need to get on and off at.
- Arrive at the tube station. Just inside the entrance, there will be gates with a white circle on the right-hand side. Place your bank card or Oyster card on this circle and the gate will open for you. If you have a physical ticket, insert this in the slot underneath the white circle. You have now ‘tapped on.’
- There will usually be a big map of the underground system and arrows telling you which platform you need to be on to catch the correct train.
- When you arrive on your platform, make sure that the train you want is displayed on the screen. If it isn’t, you might be on the wrong platform or have to wait a bit longer.
- When the train arrives at the station, an announcement will play to let you know what train it is and where it is headed. Make sure you listen to this or check the noticeboard to make sure you are getting on the right train (sounds silly but I made that mistake).
- Once on the train, keep your belongings close by taking valuables out of easily accessible pockets, zipping up your bags, and putting your handbag and/or backpack in front of you. London has a pickpocketing problem, so it’s better to be safe than sorry.
Remember what station you need to get off at and listen for the name when they arrive at each station. There are maps above the windows on the train. I found it helpful to check which station was the one directly BEFORE the one I wanted to get off at, so I could be ready. - When the train arrives at your stop, get off and follow the crowd to the exit. Tap your card once again on the gate to exit. This is so the system knows how far you travelled and how much to charge you. The transaction sometimes takes a while to process in your bank statement.
Remember that a single journey is only finished when you ‘tap out’ through the gates. So if you want to change trains/lines, don’t exit the station, just get on your next train! This is to avoid paying for two journeys.
There you go, you just took the tube, look at you!
Getting to and from Heathrow Airport
It is really easy to get to and from Heathrow Airport.There are two options, depending on your budget and patience.
The Heathrow Express is the fastest and the most expensive at £25. It takes only 15 minutes to get from Heathrow Airport to Paddington Station.
However, there is currently a new special offer on the website, offering non-refundable and non-amendable tickets for £10!
The regular tube is much cheaper but takes much longer (1 hour to get to/from King’s Cross). The two tube lines that go to Heathrow Airport include:
- The Elizabeth Line (purple)
- The Piccadilly Line (dark blue)
This is a very simplified explanation of how London’s underground works from the perspective of a visitor.
Make sure that you check the Transport for London website before departing as the process and fees may have changed.
I hope this post gives anyone who was feeling nervous or unsure about using the London tube the confidence to get out there and try it!
And remember, worst case scenario, you end up at the wrong station. So what? You’re still in London and you’ve got no where important to be (assuming you’re on holiday). Ask a station employee for help, or just put your destination in Transport for London or Google Maps and try again!
If you’re visiting London (I know you are, you just read this post!), check out my best and most perfect 4 day London Itinerary!
Pin this!
More from London…

Destinations
Join me on Pinterest!
Latest Posts
- The Ultimate Singapore Itinerary for the Colonial District
- The Ultimate 7kg Southeast Asia Packing List for Backpackers
- How to Spend 10 Days in Bali: Seminyak, Ubud & Nusa Penida!
- How to Spend 48 Perfect Hours in Seminyak, Bali!
- TOP 5 FREE Things to Do and See on Nusa Penida!
Thanks for reading, I appreciate you!